One of the more recent and exciting developments in my content, branding, and community-building lately has been my Discord interactions. Discord is an incredibly popular voice, video, and text chat platform that got its start in the gaming community, but has since expanded to much more. It piqued my interest over the last 12 months as I was learning about NFTs. Discord servers were incredibly important for other NFT communities like Cryptopunks and others that I paid heavy attention to. When it was time for the VeeFriends launch, I knew that Discord would be a great way to make sure my community was at the forefront of the NFT explosion.
Initially, I wanted the VeeFriends Discord to be a great community tool for people to learn and exchange. My team would connect with members to answer questions, and members would network and share with each other as well. What I didn’t anticipate was how easy it would be for me to be involved so heavily.
Much like early Twitter, I find myself being quite active in the VeeFriends Discord. It’s incredibly easy to use on both desktop and mobile, and I have a funny feeling this will be the prime social media destination for many of you trying to build your own communities moving forward. That being said, I decided it was time for a Discord 101 article to help you out.
I’ll hand it over to my team for a comprehensive introduction to Discord — how it works and how to use it. I hope it helps.
Team GaryVee here 👋
Hi everyone. As many of you know, the VeeFriends Discord was originally created to build community, answer questions, and further NFT education ahead of the VeeFriends launch. Since then, it has evolved into a thriving hub where over 150,000 people gather daily to exchange ideas, information, and resources. For perspective, since it was started back on April 28th, there have been 350,000+ messages sent in the general channel alone! Without a doubt, we couldn’t have built such a dope community without the vast array of features and freedoms that Discord provides.
Especially in light of the pandemic, Discord has been instrumental in helping people to get together even at a distance. Popular among gamers, the platform can be used for so much more…including streaming music with friends, hosting book clubs, meetings, or just hanging out online. From text and voice chat to moderators and bots, we believe that Discord is the best community-building tool out there. While there are other social media platforms that have community-building capabilities — like Facebook groups — Discord has hands down the most utility for anyone looking to start a public or private virtual group.
Whether you’re an influencer, a business, or just interested in learning more about the platform, this article will cover all bases to help you get started. We hope you find value in it!
Creating an Account and Installing Discord
One of the reasons we love Discord is because of its accessibility. For one thing, it’s completely free to use. Users do have the option to pay for Discord Nitro for access to premium features, but we’ll touch more on that later on. Secondly, Discord is available both in web version (via desktop browser) and as a downloadable app for your computer or mobile devices. We’ll talk about mobile later, but first, let’s start with the computer.
To create your Discord account, go to discord.gg. There, you will see the option to either download the app to your computer or open Discord in your browser.
If you are going with the latter option, click “Open Discord in your browser,” create a username, and check the box for Discord’s Terms of Service and Privacy agreement. After you confirm that you are not a robot with a quick CAPTCHA test (online test to determine whether a user is a human or a bot), you will be brought to a “Welcome to Discord!” screen. Enter your birthday and voilå! You’re ready to go. Before you exit the browser window, Discord will prompt you to claim your account by signing up with an email address and password. Claiming your account is an important step for storing all of your chats and server activity — be sure to do it!
If you prefer to use the desktop app, click the download button and then double click on the file to begin the installation process. Once the app is on your computer, double click the Discord icon to finish the installation and launch the app. It will detect and sync up with the existing account you created via the browser version. If you are starting out with the desktop application, you will have to create your username and password and enter an email address.
While either version works great, keep in mind that the app comes with certain freedoms that aren’t accessible with the web version, like streaming video to your channels. After you have Discord installed and your account is set up, you’ll want to get in on the action by creating or joining a community server.
Most Frequently Used Discord Features
Discord offers lots of features that make it easy to tailor your experience to your needs. Let’s cover a few of the most commonly used, including servers and streaming.
How to Make and Join Servers on Discord
First, what are Discord servers? Servers are essentially different community spaces hosted within the platform. They can be public — typically large with hundreds or thousands of members — or private — smaller, more intimate groups meant for specific friends. Servers are created based on specific interests or hobbies that the joining members have in common. You can think of servers as online clubs full of like-minded enthusiasts.
Every Discord user can join up to 100 servers.
Joining a Server
One way to get started is to join a server that you know already exists. For instance, if you have a friend who uses Discord and has a server, they can send you a link to invite you to join. Once they send you the invite link, you simply click it to enter and boom! You’ve found your first Discord home.
Alternatively, you can use Discord’s search function to explore all the servers available and find one that you would like to join. Click the “Explore Public Servers” icon on the left hand side of the screen or app to open up a server browser.

This will take you to a “Discover” page where you’ll find a selection of featured communities — these are typically larger, more popular servers with high member counts such as the Minecraft or Official Fortnite communities. You also have the option to search by niche or topic by clicking on a category that corresponds to your interests. The categories on the Discord Discover page include Gaming, Music, Education, Science & Tech, and Entertainment.

Lastly, if you’re not sure exactly what kind of server you want to join and just wish to poke around a bit, you can simply type in any keyword of your choice in the “explore communities” search bar. For example, whether you want to find a group for all things cryptocurrency or a group for people who love K-pop superband, BTS, just type it in the search bar to see if the server exists!
Making a Server
Perhaps you want to create a server of your own. Hit the plus sign on the left hand side to add a new server.

When the prompt window pops up, click “Create My Own” and then Discord will take you through a series of prompts to help you get set up.

Decide whether your server will be for a larger public group (club or community) or just for you and your friends.

Once you’ve done that, Discord will ask you to customize your new server with a name and a picture icon. This is how people will come to know and recognize your community, so choose thoughtfully! Click “Create.”

Congratulations, you’ve now created your own Discord server! Note that once created, your new server will be empty. In order to kick things off, you’ll have to create some “text channels” and/or “voice channels” for server members to interact with — more on that in a bit.
Admins and Mods
When you create your own server on Discord and claim your account, you become what is called an administrator aka admin. This just means that you are the person in operation of the server. You may then appoint other people to serve as moderators, or “mods.” Mods simply help you to run the server and manage the community and can have whatever responsibilities you decide, from deleting messages to inviting new members and more. For this reason, it is always a good idea only to appoint moderators that you trust. Admins and mods work hand in hand to oversee server communities and are typically the trusted authority figures that your community will defer to for help with any questions or concerns.
Since reliable moderators are so important, here are a few tips the VeeFriends team used to find and assign our community mods:
- Create an online application — To avoid being overwhelmed with DMs, texts, and emails, we created a Google Form which consolidated all moderator applicants in one convenient location.
- Prioritize applicants who have prior experience — We found that it was best to choose people who already had a thorough understanding of the platform and were proven members of other Discord communities. A familiarity with bots and how they operate was also a plus.
- Use a bot to identify your most active community members — Statbot was great for helping us find existing server members who were already living and breathing the VeeFriends community. By choosing these kinds of members to be mods, we were confident that they would be strong eyes and ears for the server.
Inviting People to Your Server
Being the only member of your server is no fun…as the admin or mod, you’ll want to invite others to start building your community. Right click on your server icon and click “invite people.” You can either invite friends that already have Discord accounts or you can create an invite link to distribute wherever you like.
How to Create a Channel on Discord
Within each server exist “channels” where members can gather to communicate via text or voice. Basically, if joining a server is like joining an online club, starting a channel is like starting a conversation with your club members. As you might have guessed, text channels allow members to chat in written form while voice channels are video and audio-based. The former are denoted by a hashtag symbol while the latter are represented by a speaker.
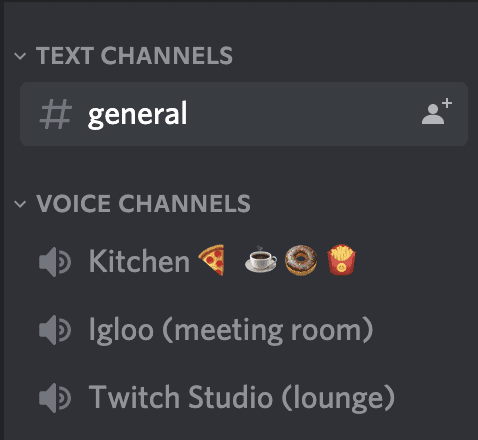
Just like you name your server, you will have to name each of your text and voice channels. For organization’s sake, you can then group several channels under a category, which also has its own name. In the above example, “Text Channels” and “Voice Channels” are the categories while “general,” “Kitchen 🍕☕️🍩🍟,” “Igloo (meeting room),” and “Twitch Studio (lounge)” are the various channel names.
Click on your server name at the top of the screen and then choose “Create Category.” You will then be urged to enter in a category name. Once created, your new category will appear on the left hand side of the screen. From there, click on the ➕ button next to your category name to create a new channel. Decide whether you want your channel to be text or voice, and then give it a name. Your new channel will then appear on the left hand side underneath its corresponding category. Note that you can create your categories first, and then your channels or vice versa. Once your categories are created, simply drag and drop channels under categories to organize them as you like.
Ultimately, the main purpose of channels is to create micro communities within the larger server group. To create the best experience for your community members, we recommend starting off with simple channels to meet general needs, and then expanding as you learn more about your community’s different interests. For instance, when the VeeFriends Discord was first launched, the primary objective was to educate Gary’s community on all things NFTs, blockchain technology, and security/privacy. The team wanted to make sure that people had all the information and understanding they needed to be able to safely participate in the project, and the server’s early channels reflected those needs.
Once VeeFriends was launched, the objective shifted into community-building, and so many of the subsequent channels were based on recommendations from group members themselves. From coder talk to crypto chat and collectibles/flip life, the team took cues from the community on how to build out new channels that would fill their needs. For example, the #helpful-articles channel links members straight to educational content on Gary’s blog. The FAQ channel addresses the most common questions. There’s a channel all about VeeFriends giveaways and another just for new members to introduce themselves. See all of the current VeeFriends channels below:
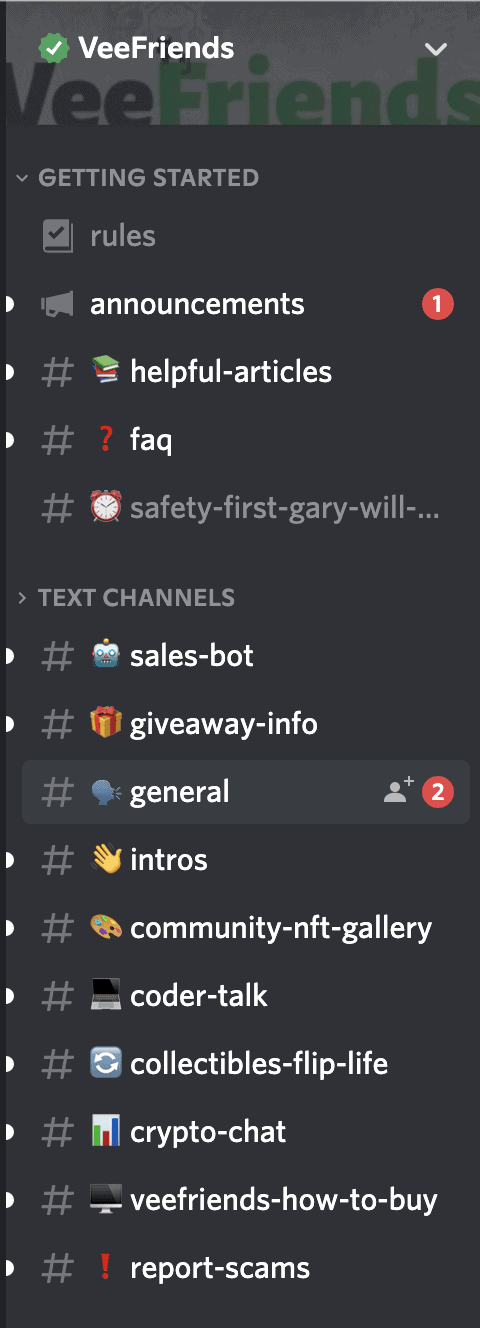
It’s only just getting started! As the community continues to grow, the VeeFriends team will continue to build out more roles and channels to create an even better experience.
How to Chat
Chatting in Discord channels is simple. To enter a channel, just click on its name. For text channels, just type and send like instant messaging. For voice channels, just start talking. You’ll notice a green highlight surrounding your avatar any time Discord picks up on your voice or audio. Within voice channels, you also have the option to turn on your camera to video chat with other users by clicking “Video.”

(h3) How to Stream on Discord
One of Discord’s most popular features is live streaming or screen sharing. While the two are slightly different, both functions allow you to do essentially the same thing: share the contents of your screen with other users in a Discord voice channel. This is perfect to take your virtual hangouts to the next level, whether you’re gaming and want to show off a cool play, you’re in a meeting and need to give a presentation, you’re hosting a virtual game or movie night with your friends, or really any other reason. It is important to note that whether you are streaming or sharing your screen, this feature is only available in voice or video chats; it is not possible in text channels. Let’s first dive into streaming.
Discord’s live streaming feature is also called “Go Live.” Basically, it allows the platform to recognize other programs you are using on your computer and stream them to your server in real time. This is an especially useful tool for gamers on platforms like Twitch who want to show their gameplay for others to watch.
Here’s how it works. When you enter a program — let’s say, a video game — Discord will pick up on your activity and a Go Live button will appear next to the game you’re playing. You can then click this button to begin your stream and anyone in that voice channel will be able to join and follow along.
(h3) How to Share Screens and Windows on Discord
Again, screen sharing is very similar to live streaming but with a slightly different process. Start by clicking on the voice channel you want to enter. Then, click the “Screen” icon to begin sharing your screen.

A window will pop up asking you to choose what you want to share. You can either share your entire screen or a specific application window. Note that if you choose to share a specific application, viewers will only be able to see that window. This means that if you exit or switch applications, the stream will be paused until you re-select the chosen application. On the other hand, sharing your entire screen allows viewers to see everything on your computer, regardless of which applications you’re using.
To begin screen sharing, make your selection and hit the “Go Live” button. To stop your live session, hit the red button.

If you want to join someone else’s livestream, all you have to do is click their username. If they are currently live, aka sharing their screen, there will be a red “Live” icon beside their name. Once you click their name and join their stream, you can resize the viewing window and increase/decrease the stream volume to your liking.
Discord for Mobile Devices and Tablets
For on the go users, Discord is available for both iPhone and Android devices as well as tablets. Simply download the Discord app from the App Store or Google Play Store. Launch the app by clicking the Discord icon on your phone. If you’ve already followed the steps above and have an existing account, all you have to do is log in by entering your email address and password. If, however, you are creating your first Discord account via the mobile app, press “Register” to create your account and enter a username, password, and email address or phone number. Then hit “Create an account.” You can also choose whether or not to opt for two-factor authentication.
While the computer application provides the most complete experience, the mobile app is still a great option with ongoing updates upgrading the user experience. For instance, mobile users can now screenshare, a feature that was once reserved for the desktop app. That being said, the mobile layout will be slightly different than the desktop app or browser service, so if you plan on using Discord primarily on your phone or mobile device, be sure to read through this in-depth support guide on using Discord mobile.
Customizable Settings
Discord is extremely customizable; the platform offers a variety of setting options to make your experience as simple or advanced as you need. You can adjust your settings by accessing the “User Settings” gear next to your username toward the bottom of your screen.

Appearance
As you might expect, the appearance setting refers to the aesthetic layout of your Discord. Here, you can choose between dark or light mode for your theme display and font size for your messages. You can even get super specific and set zoom levels or the space between groups of messages. It’s all up to you. Check out this guide for support on changing your Discord appearance/theme.
Accessibility
When you begin using Discord you’ll quickly notice it’s a great place for using gifs and animations. While this is great fun for the community, Discord thankfully offers the option to reduce motion settings to make their platform more accessible to users who are sensitive to excessive motion and movement on screen. On this setting page you can choose whether to enable automatic play for gifs and animated emojis, as well as toggle on/off for the text-to-speech function.
Voice & Video
Here is where you can customize your audio/video experience. Choose an input and output device for your audio source and control the volume. You can also choose between “voice activity” and “push to talk,” or even enable noise suppression so your friends can hear you crisp and clear. Select the camera you want to use for your video purposes and test both your camera and mic to be sure everything is up and running.
Text & Images
In this window, you can control how all your messages and images are presented when shared. Do you want display images for your pics and videos? Do you want website previews when you copy and paste a URL address into a channel? Do you want the option of using emojis to react to other people’s messages? This is where you decide.
Notifications
Discord gives you the option to enable desktop notifications so you can always stay up to date with your community’s latest conversations. You can even customize the length of time for which you need to be inactive on your computer before the app will send you a push notification.
Keybinds
Another setting available only via the desktop app, a keybind is essentially a singular keyboard key or combination of keys that gives quick access to a specific corresponding function within the app. Discord allows you to add as many keybinds as you want, but you’ll need to create them each individually and assign them to a particular action. The actions the platform allows you to keybind are: Push to Talk (normal), Push to Talk (priority), Push to Mute, Toggle Mute, Toggle Deafen, Toggle VAD, Toggle Streamer Mode, Navigate Back, and Navigate Forward. For a more detailed explanation of keybinds and what they allow you to do, please check out this reference guide.
Language
Discord allows you to select your default language from a list of 30 languages.
Streamer Mode
Streamer mode is essentially Discord’s way of protecting its users from potential leaks of their sensitive information. Imagine that you’re sharing your screen with dozens or hundreds of people in your server when you get a text notification at the top of your screen. Well, everyone watching your stream has just seen it, and those with potentially harmful intentions can even screenshot and distribute your personal business on or off the platform.
To avoid this, streamer mode allows you to hide certain information while you are streaming. By enabling this setting, you can hide texts and emails, make your DiscordTag (the number next to your username) anonymous, and disable sounds and notifications. It can also make your server invite link private so that random people cannot find and join your community unless invited.

For more information, check out Discord’s Streamer Mode 101 support guide.
Activity Status
Let your fellow Discord users know what you’re up to with a status message. When toggled on, the platform will automatically update your status based on your current activity, like if you’re playing a particular game, listening to Spotify, or attending a public stage.
Discord Bots
Especially for larger servers, it’s always a great idea to implement bots — or automated robots — to automate specific tasks and functions. For instance, with over 150,000 members in the VeeFriends Discord, it would be overwhelming for one or even several human members of the VeeFriends team to manage the community in 100% real time. By using Discord bots, we are able to make sure that the server runs smoothly and responsibly at all times. Some common uses for Discord bots include: welcoming new users, filtering out spam, banning members who violate community guidelines, and playing games.
Now, let’s discuss some examples of how we use bots to our advantage in the VeeFriends Discord. For one, we have a bot that sends an automated message every 30 minutes in the general channel giving best practices and advice for avoiding scams. As this is our most active channel, the bot helps ensure that as many members as possible see this important information and are protected against potential VeeFriends-related scams and phishing attempts.

Another bot filters out suspicious messages to help us actually catch scammers. Yet another one flags derogatory words and other offensive messaging we don’t want shared in our community. As you can see, bots are another set of eyes and hands helping you to scrub your server of potentially harmful participants and maintain a safe space for all. Like the VeeFriends’ Carl-bot, you can even give them a name and photo so they become a personable and easily recognizable member of the group. When used effectively, bots become an integral part of your Discord server structure that your community will appreciate.

Where to Find Available Discord Bots
All kinds of bots can be searched and found online and then added into your Discord server. Some of the most popular websites for finding bots are Discord Bots, Bots on Discord, and top.gg. Once you’ve found your desired bot, click “invite” to add them to your Discord server and authorize them to perform the desired functions.
How to Create Custom Discord Bots
Alternatively, you also have the option to create your own bots and add them to Discord’s Development Portal. Check out this guide for a detailed reference on how to create, program, and implement your own Discord bots from scratch.
Discord Nitro
As mentioned earlier, Discord Nitro is the paid alternative to Discord’s free service, and it is available in two tiers: Discord Nitro Classic and the standard Discord Nitro. For a monthly or yearly subscription fee, Nitro users gain access to additional perks and capabilities to further customize and enhance their platform experience. While not necessary for Discord’s basic functionalities, upgrading to Nitro does come with valuable benefits including higher upload size limits, higher quality for video and live streaming, custom emojis and animations, and gif or animated profile avatars among other benefits. For a more detailed look, check out this breakdown of all the Discord Nitro offerings.
Currently, standard Discord Nitro is available for a monthly fee of $9.99 ($99.99/year). Nitro Classic is more affordable at $4.99/month ($49.99/year), but comes with less capabilities.
Discord Insights
Finally, Discord thankfully provides pretty robust insight information for large servers (500 members or more). These insights are very helpful to administrators and/or moderators who need to assess the health or growth of their server community. From the insights tab, you can view audience information like where your members are from and how long they’ve been in your community. You can also see your engagement information — your most popular channels, how many people are talking in your server, etc. For a full list of information accessible via Discord Insights, read this Server Insights FAQ.
Takeaways
That was a lot of information, so let’s do a quick recap. Discord is a value-packed platform with a wide range of features and settings, but luckily, its customizable interface makes it pretty user-friendly once you get started.
- Creating an account and installing Discord — as easy as signing up with a username and password, and don’t forget to claim your account with an email! Choose between the browser version, desktop app, or mobile app.
- Most frequently used Discord features — from making and joining servers and channels to streaming, sharing screens, and more.
- Discord for mobile devices and tablets — access the platform on the go from your iPhone, Android, or tablet.
- Customizable settings — curate your Discord experience exactly how you want from theme and display to notifications, keybinds, and more.
- Discord bots — learn how to automate messages and manage your servers with the help of bots.
- Discord Nitro — want even more perks? Upgrade to the paid version of Discord with Nitro Classic or Standard for a monthly fee.
- Discord insights — all the information you need to track your server’s growth, from engagement to audience demographics and more.
By now, we hope you have a thorough understanding of Discord and all that the platform has to offer. We also invite you to join the VeeFriends Discord community to take a look around and see it in action!
If you found value in this article, it would be amazing if you shared it on your favorite social media platform!

